Being able to shave with a straight razor that you sharpened by yourself comes with a different level of satisfaction and accomplishment.
Honing is not the same thing as stropping. Honing is the process of sharpening a straight razor by removing steel to form a new edge on your blade. Stropping is when you realign your edge between shaves.
In my opinion, honing your straight razor is the key to self-reliance and sustainability. With the right tools and skills, you can ensure your blade is kept sharp until you pass it down to whoever you chose to. Leaving the blade’s responsibility for its new owner.
In as much as it may seem complicated but the truth is sharpening a razor is a lot easier and straight forward than sharpening a knife.
You should know that sharpening your blade is a lot easier when you take good care of the blade and maintain it properly. Because when you are careless with the blade, and you finally decide to tune it up, it will be difficult to do so.
Let us look at techniques that will help you keep your blade sharp. And for those who like to be adventurous, we would also look at a couple of advanced techniques.
Words and terms used to explain razor sharpening and honing

Bevel edge blade
The bevel edge is the part of the edge that is being sharpened. On either side of the cutting edge is a bevel. Pay close attention as the bevel is gradually polished during honing. Try to keep the bevels at a consistent width along the edge and a similar width to each other. The more you grind a particular section, the wider the bevel gets.
The razor Burr

The razor burr is the rough patch of steel that is formed when you sharpen something. It begins on the opposite side of the blade in which you are grinding, making it easy for you to tell when the edge has come in contact with the other side. When forming a new edge, it is important to get a burr. However, the burr needs to be removed after every stage of sharpening (generally speaking, when you move from a coarser grit stone to a finer stone).
The razor De-burr
The de-burr is simply the process of removing the burr. When you remove the burr, the edges become smooth, and so it cuts properly. There are various ways in which you can achieve this. The same stone can be used to do rough de-burring, all you need to do is pass the razorback and forth through its surface like you would with honing. Often times, a suede strop covered in chromium oxide is used because it grabs the steel and de-burrs very effectively. And your final de-burring should be done on a strop.
Chromium Oxide
The chromium oxide is a paste that is waxy in nature and filled with incredibly fine-grit ranging from 13,000 to 50,000. This paste doesn’t grind steel the way stone does; instead, it buffs the surface of the steel to a mirror shine and grasps on burrs that are most like hanging on the edge of the blade. If you are a serious sharpener, then this is compulsory.
The razor's Heel
This is the end of the razor’s edge that is closest to the handle.
Razor edge's Grit
A blade's grit has numbers (#1,000, #8,000, etc.) that represent its size and the type of edge you will get. It is an abrasive that is necessary for the sharpening whetstones to be efficient. Grits with lower numbers are larger in size, cut faster and leave rough edges, and grits with higher numbers are smoother and cut slowly, just like sandpaper.
The razor sharpening Strop
A strop is a piece of leather used to de-burr and polish edges. As a final polishing step, strops are used on almost all kinds of blades. As an owner of a straight razor, you need to have at least the standard flexible strop. However, it is best to get a paddle strop and cover the rough side of the suede in chromium oxide to help you polish your blade.
The sharpening Pass
This is the process of gliding the razor across the stone in one direction and back again on the other side of the edge.
Hone/Sharpen your razor
A lot of people get confused by these two words. But honing is the same thing as sharpening, which can further be defined as the act of grinding steel to a fine point. But in the world of razors, the term honing is used more often.
The razor Toe
This is the tip of the razor that is farthest from the handle.
The techniques for Honing and Sharpening of your straight razor

The fundamental method of honing or sharpening a straight razor on a whetstone is easy;
- Place the razor flat on the end of the whetstone close to you with both the edge and the spine on the stone in such a way that the spine sets the angle.
- To enable the weight of the razor, do the work, push it away from you to the other end of the stone with the edge going first.
- Now lift up the razor and flip it or roll it over the spine, then push the edge of the blade first back towards your end of the stone. You will need to work with the stone’s length.
That’s really all you need to do. Basically, the way you hone is more like the way you strop, but in this case, the edge leads and not the spine.
What you can and cannot do when sharpening and honing your straight razor

Now let us take a look and the dos and don’ts with sharpening razors at home;
- Do not hone on a dry stone, make sure your stone is wet with water.
- Do not allow any edge of the stone to tip-off. Placing a fingertip on the toe of the razor will ensure balance. Or you can as well place several fingertips along the length of the spine. Do not push the razor into the stone, allow the gentle weight of your fingers to handle the job.
- Never sharpen a blade as you would sharpen a knife at a precise angle. Allow the spine of the razor to set the angle.
- Do not flip the blade over the edge, scraping it will get it blunt.
- Always stop before you arrive at the end of your stone.
- Do not try to be fast, especially if you are doing it for the first time. When you keep practising, speed will follow. As a learner, going quick can lead to mistakes will not only harm your fingers but mess up your razor too. I mean even professional cause errors when they are in a hurry.
- Some razors are longer than the stone, and the stone is wide, but there is no cause for worries. Just start the heel on the stone and the toe overhanging a bit. As you move it smoothly across the stone, slowly shift it to the side, creating enough distance to bring the toe onto the stone and have the heel overhang. Be careful enough not to amplify the motion, all you need is a slight diagonal stroke.
- Stones wear out with time and cause their surfaces to be uneven. So endeavour to use only one side of your stone. Because when you flip it, the stone shakes and this can be frustrating. You can label the other side with a big X, although some stones have logos on the back, this way it is easy to tell the side you are using.
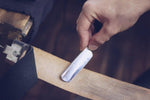
The image above shows a basic technique you should strictly adhere to with constant practice. Just as you see above, do a couple hundred strokes on your finest stone to get it down-pat. When you use a fine stone, you are preserving the life span of your razor as you practice.
The process of sharpening razors

Since you now know the basics, let us talk about stones that you will use in sharpening your blades.
First of all, test your razor to see if it cuts and scrapes well enough. If you are sharpening a razor that you use often, you will most likely know what to do with it, but if it is a new razor or a blade you aren’t familiar with, then you will need to be more careful with it.
Peradventure you just purchased the blade, or it doesn’t belong to you, ensure you sanitise it in 70-80% alcohol first.
After you clean it, strop it properly on chromium oxide to remove any rough burrs and to clean up the edges. Edges that can barely cut is something we often see in the shop, but immediately it is adequately stropped, it cuts very well.
If the edge or your blade is relatively smooth, you will probably need a tune-up on an 8,000 or maybe a 12,000, so head to step 3. But if it scrapes your skin, you will want to start at 4,000 to clean up the scratchy edges, you will begin at step 1.
And if your razor is so blunt that it doesn’t cut at all, then you will have to start on a much rougher 1,000 or 2,000 grit.
You will have to be careful when using this grit because they remove steel very fast. Take your time and strop for as long as you can to see if you can avoid using a rougher stone.
If this process doesn’t work, we will talk about putting an edge on your blade in the latter part of this article.
If you hone your razors often, you will get better at knowing the right way to handle your blade.
- If you choose to begin on 4,000 then make 40 to 60 glides of the blade through your stone, in sets of 20 strokes while checking the edge after every stage (just so that if you are making a mistake, you can catch it quickly). A back and forth movement along the stone is counted as one stroke, and the number of strokes will vary depending on how hard the razor is. The softer razors like those made in Germany need fewer strokes, while the denser Japanese made razors and the Portland Razor company need more work. Once you are through with using grit, make sure you rinse the blade thoroughly, so you don’t bring grit onto your fine stones.
- With the 8,000 stone repeat same technique for 80-100 glides. Finer grits require more passes than the rougher ones because finer texture grinds steel a lot slower. When using this stone, be very gentle. Rinse your blade again when you are done.
- On your finishing stone, do the same process again for 100-150 passes, you can exceed this number if you are convinced that your blade needs more. But be very careful and allow the stone to do all the work.
Finishing the sharpening of your razor blade edge
You can learn how to use a strop by checking out our blog and video on how to Hone your straight razor.
Ensure you clean your blade thoroughly, then strop it and test it. During testing, check if it cuts hair with ease or struggles if it scrapes the skin or leaves it free of scratches. You may need to try shaving with it, so you get a complete feel of what you are working with. If the blade shaves just how you want, then that’s wonderful.
But if you are not satisfied with how the blade is shaving, it is time to troubleshoot with the following steps;
- Strop your blade using chromium oxide. Burrs that are not correctly removed after honing can make the edge feel rougher than it really is, so make sure you get rid of them. And if this doesn’t give you the result you want, then go back to using a 12,000 grit, strop and then try again.
- Following the same approach, work back step by step till you finish and is satisfied with the result you get.
- If all of this still doesn’t get you what you want, then you can go back to using a rougher stone that removes more steel.
When you practice often, you become perfect at deciding which steps to start with first and which will give you the result you want.
Just do whatever you feel will get you your desired result and feel free to ask a question and ask for help if you need.
Related reading
Tags
Blog posts